correcting white balance
a repost by ashley of Ramblings and Photos
If you follow my blog, I've mentioned that I have an ongoing battle with the lighting in my inlaws' home. In fact, I'll be there this weekend! Although I operate primarily out of Adobe Camera Raw and Photoshop (as well as Photoshop Elements), I wanted to offer some tips that could be applied in any program as it relatest to correcting your white balance in post-processing. First, let's start with a SOOC shot (straight out of the camera). You might never know it if you only looked at my edited shots, but here is one of the originals:
How ya like that white balance? Or lack there of.
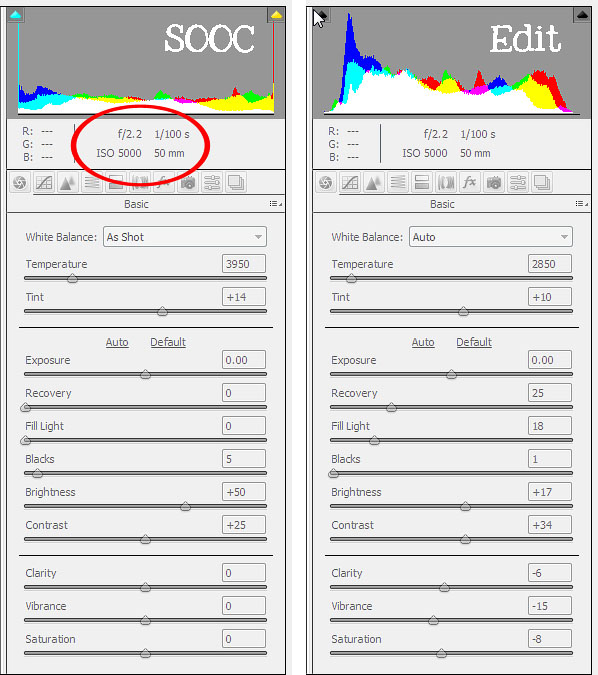
Anyways...as I mentioned before, I wanted to start simple....so, I started this edit in Adobe Camera Raw. Regardless of what editing program you're working in, you should have some of the basic functionality that Adobe Camera Raw offers. If you are using Photoshop or Photoshop Elements, you already have ACR (and although I shoot in RAW, you can open JPG files in ACR by opening PS or PSE - go to File > Open As> Select open as Camera Raw file and select your image). Below, I've copied my SOOC data and the revisions I made in Adobe Camera Raw. Here's what I did:
Anyways...as I mentioned before, I wanted to start simple....so, I started this edit in Adobe Camera Raw. Regardless of what editing program you're working in, you should have some of the basic functionality that Adobe Camera Raw offers. If you are using Photoshop or Photoshop Elements, you already have ACR (and although I shoot in RAW, you can open JPG files in ACR by opening PS or PSE - go to File > Open As> Select open as Camera Raw file and select your image). Below, I've copied my SOOC data and the revisions I made in Adobe Camera Raw. Here's what I did:
- Used AUTO to correct my white balance (it's pulling from the white of my nephew's teeth).
- Pulled the recovery slider up.
- Dropped my blacks a bit.
- Decreased my brightness.
- Increased my contrast.
- Decreased my clarity.
- Decreased my saturation.
Just making those few adjustments creates a nice clean edit. I've included my edit below. If you're new to editing, I encourage you to try adjusting the exposure, brightness and contrast within your editing program.


I should warn you that most editing programs offer an "Auto" option. Sometimes selecting auto works perfectly but more often than not, you'll need to make some manual adjustments. I'm finding more and more that I use my eye dropper to select an area of the image that is meant to be white, black or gray. In many cases, I'm left with the whites of a person's eyes.
So that was my very basic edit only using Adobe Camera Raw. If you're interested in an advanced edit...keep reading.
Beyond my edit in Adobe Camera Raw, I brought my photo over to Adobe CS5 (also known as Photoshop). Most of my steps can also be performed in Photoshop Elements. Here are my steps:

- Created a duplicate of my background. I applied a high pass filter (found under FILTER at the top of the screen). I then applied a soft light blending mode to the layer. This is my #1 favorite trick to make the details of your image pop. You can lower the opacity if needed and/or use a layer mask to erase part of the effect.
- Created an adjustment layer - CURVES. In PSE, if you don't have an action curves adjustment, you can download one here (it also includes a mask layer that I use often).
- Created a new adjustment layer - LEVELS. I pulled the left side (shadows) of the graph to a 11 - this makes my blacks just a tad bit darker. I pulled the middle bar (mid-tones) up to a 1.11 I often pull the midtones up to a 1.38 to brighten up an image, but that was not necessary here.
- Created a new adjustment layer - BRIGHTNESS/CONTRAST. I decreased brightness to -10 and added a contrast of 8.
- Created a new adjustment layer - HUE/SATURATION. I find with my computer that I always have to pull back on my yellows and reds (if I want to avoid creating oompa loopmas).

Beyond this point, I felt like my shot looked a little too much like a snapshot (nothing wrong with that, I mean, it is a snapshot), so I decided it needed to be cropped. I used the same photo ratio to crop the photo. I then made a few more adjustments and created two photo options (I wanted to share both a color and black/white). With my color shot:
- Created an adjustment layer: BLACK AND WHITE (in Photoshop Elements, you'll want to use a background copy then go to Enhance>Convert to Black and White). I created a custom black and white by playing with the sliders and adding a tint. I also lowered the opacity to 15%.
- Adjusted my brightness/contrast and levels adjustment layers for a little more drama.
- Finally, I applied Totally Rad's Lux action at 50%. For a similar effect...you can create a new fill layer - fill it with a shade of cream or light pink, set the blending mode to screen and lower the opacity.
___________________________
repost by ashley of Ramblings and Photos
Join us every weekend for a new muse university post!
If you would like to provide a post for this series, please contact kat [at] kateyeview.com


