about More Musing

We are focusing on building a community, bringing the Mortal Muses photographers together, and making the world a bit smaller. On this page, you will find mission: MUSE, muse university and special features.

Friday, February 25, 2011

muse university - confessions of an i-shutterbug

confessions of an i-shutterbug:  10 tips for better mobile photography
by christy of urban muser

It's no secret that my cellphone is the apple of my i (ooh, bad joke, sorry).  Ahem, anyway...I love the creative process of using my iPhone 3GS to shoot, edit and instantly share my images with the touch of a button and a swipe of a screen.  Although I'll focus this post primarily on iphoneography, I hope it may still inspire others to explore the growing world of mobile photography on whatever device you may have in your pocket or your purse.
{"foggy GWB"; app: lo-mob}

Although iphoneography has liberated me from many of the "rules" of traditional photography, here are a few things that I try to keep in mind when shooting with my phone:

1.  Steady as you go.  As with all types of photography, a steady hand is key.  This is even more important when shooting with a camera phone, as every little bit of shake and movement can affect your image, and you are less likely to have image stabilization to help you out.  For you iPhone users out there, remember, the camera shoots upon release of the shutter button so you can to tap the shutter, hold it, steady your image and release to take the photo.

2.   Play with light and color.  Some may disagree with this, but I say go ahead, point that iPhone right into the light---it has a way of turning bright lights and what might otherwise be considered "overexposed" photos into something interesting. The iPhone lens also captures color really well, so experiment and see what you come up with.

{"winter sun"; app: camera+}

3.  Composition is key.  Since my iPhone doesn't let me control aperture, shutter speed or depth of field, it makes composition all the more important.  Try to fill the frame with your subject as much as you can, and don't forget to change your perspective once in a while.  Get down low, look up high, or turn the phone on an angle for a unique look.

4.  Capture the everyday.  Go ahead, photograph those little things you might not usually pay attention to. The camera phone has a way of providing a close and intimate feel to many photographs.  So get out there, and experiment with whatever catches your eye.

{"leaf tattoo"; apps: format 126, picture show, ps express}

5.  Don't over process.  Just as Photoshop and other editing programs can't make a bad photo good,  using several different apps and cool effects won't mask a bad mobile photo.  It will still just be a so-so photo with an interesting light leak or a vignette.  [OK, it can be fun every once in a while to do something abstract and completely over the top, but don't tell anyone I said so.]

6.  Practice, practice, practice.  As with anything, you'll get better as you take more photos with your phone and experiment with new apps.  Try to develop your eye to recognize a subject or a scene that may make an interesting photo or tell a unique story.  Sometimes you will be right and sometimes you will be wrong, but that's what the delete button is for, and your skills will improve as you click away.  And, don't be afraid to take the opportunity to be silly and creative, to channel your inner artist.  Take fun self portraits, create diptychs, look for reflections and shadows...the sky is the limit!

convex reflection
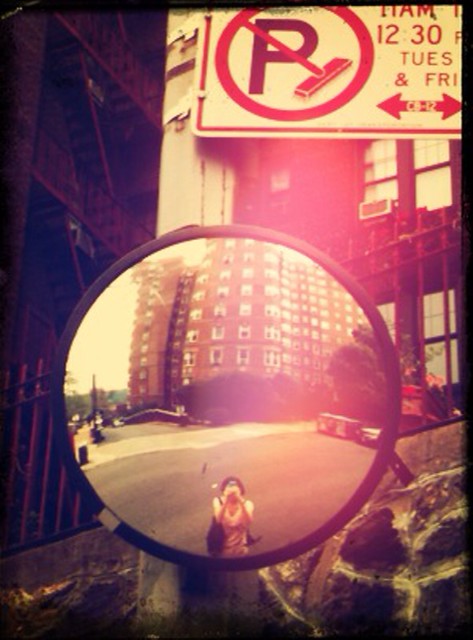
{"my convex self"; app: picture show}

7.  Yes, you can focus, sort of.  With the iPhone 3GS and higher, you have a tap-to-focus feature that allows you to tap anywhere on the screen to specify that you want to focus on that spot.  It also adjusts the exposure according to how light or dark the area is where you tap, so you can use this to (slightly) manipulate your image if your lighting conditions are less than optimal.

8.   Don't think, just shoot. Or what I sometimes like to call, pure luck.  Take advantage of not having to fumble with camera settings and be sure to capture those ephemeral moments in life before they pass you by.  Sometimes the best shots come when I don't think too much about it.  I remember when I first got the "Picture Show" app, as I was trying to figure out how it worked I snapped this photo of my cat and started randomly playing with the filters and effects.  I decided I really liked the final image, put it up on flickr, and it ended up being featured here on Mortal Muses (this was months before I became an official muse myself, and I was thrilled.)

{"cat around the house"; app: picture show}

9.  Be app-tacular.  OK, so let's get down to it, shall we?  It's not the iPhone, the camera, or any of these tips I am sharing with you.  It's all.  About.  The apps.  Well, OK, it's really a combination of these things, but installing apps on your phone gives you a virtual darkroom at your fingertips, and that is truly an amazing thing.  To be able to capture an image and process it right on my phone while the creative instinct is still fresh in my mind is so inspiring.  Crop, blur, vignette, saturate or desaturate colors, add borders and oh, those light leaks.  The possibilities are endless...but try not to abuse your newfound superpowers.

{"lonely in bennett park"; app: plastic bullet}

10.  Share and study.  You know how we love community here at Mortal Muses, and there are so many places on the interwebs to share and learn about the world of mobile photography that I thought I should mention just a few:
  • iphoneart: This one is my new favorite for sharing my iPhone images.  It's got some good flickr-esque qualities (groups, comments, discussions) and there is a real sense of community and support among the photographers.
  • posterous: I have a simple photoblog at posterous and it's an easy way for me to keep some of my favorite iPhone images in one place.  I love that I can email them there right from my phone at any time.
  • eye'em: This is a super fun place to view a constant live stream of mobile photography from around the world.
  • life in lofi: iphoneography and iphoneography:  These sites are useful for the more technical aspects--app reviews, announcements, etc.  They keep me in the loop.
{"on 187th"; apps: vint bw, camera+}

There are some amazing iphoneographers out there--I mean, real pioneers in this art form--and looking at their work will inspire you and push you to be better. Here are a couple to get you started:
  • Sion Fullana:  Check him out on flickr.  Amazing iphoneographer and street photographer.  I'm seriously jealous of this guy.
  • Valerie Ardini:  She did a beautiful 365 project with her iPhone. 
{"the green movement"; apps:  photo studio fx, camera+}

It was about a year ago that I began experimenting with iphoneography, and I've got to admit, my creativity and love of photography have been sparked by the instant gratification and spontaneous nature of this mobile art form.  Do you take photos with your phone?  Please do share your own tips and your favorite apps in the comments, I'd love to hear what you are up to.

~christy of urban muser

Saturday, February 19, 2011

muse university - shadow portraits

exploring with a camera: shadow portraits
a repost by kat of The Kat Eye View of the World


Here is a fun exploration idea that I've played around with a few times. Finding a great "shadow portrait" opportunity like the one above requires a few things:

1. Sunshine or a direct light source that throws shadows. OK, obvious. :)
2. A wide open enough surface that the shadows are recognizable.
3. Noticing the shadow.
4. Deciding on composition: Angle to capture the shadow to get the "portrait" of your subject, how much of the background to use to "frame" your portrait, etc.

You can do this with any object, it doesn't have to be people. The thing I like about these shadow portraits of our family is that they are all three of us together (since I don't turn my camera over to strangers, it's hard to get a family photo all together) and that they are also of the place we are visiting. It puts us, in that place, in a unique way.

The first photo was in Riomaggiore, in the Cinque Terre last Spring. The photo below... well, it should be obvious.


Play around with capturing shadow portraits like these, or just notice the shadows around you. Shadows add so much depth and dimension to our world, they are worth a notice of their own.


___________________________

repost by kat

Join us every weekend for a new muse university post! 
If you would like to provide a post for this series, please contact kat [at] kateyeview.com

Saturday, February 12, 2011

muse university - white backgrounds

white backgrounds
by muses kat and april with guest karen


Have you ever wanted to create professional-looking shots on white backgrounds, but aren't sure how to do it? This week, the muses are here to help! These shots with white backgrounds, also called "high key" photos, are commonly used in product photography. To capture a good high key image you need both the white background and a strong light source. Fortunately, these images are easy to create with a few simple supplies.


Both of the shots above were created on Kat's kitchen table, shown below. With the white table, white wall and a big window for natural light, she has everything she needs to create a high key shot. Once she moves the kitchen chairs and the table decorations out of the way, she's ready to set up her subject.


If you don't happen to have a white table and walls nicely convenient to a big window, you can create your own white backgrounds. Karen of Random Reflections created this beautiful still life of lemon drop cookies using foam core board.


Karen doesn't have good light in her kitchen, so she set the foam core up by a north-facing window on her dining room table.  She scored the foam core in half so it folds, and props it up with anything handy. To eliminate the seam in the folded foam core, she runs a piece of freezer paper down the foam core, matte side up, taping at the top and tucking it at the bottom. You'll notice how she allows the freezer paper to flow along the surface of the foam core, so there are no creases to create shadows.


April uses a similar idea as Karen except she uses a white poster board.  It is easy to move around the house to chase the best light and it can be slightly bent so there are no lines in the background.  Another wonderful thing about poster board is that one side is usually shinier than the other so you can get a nice little reflection if it is desired in your shot.


Poster board is very inexpensive and easy to store so it can be handy anytime you want a clean, high key shot. Just keep toddler hands away so they don't bend (see below) and goobers all over :)

Styling by an 18 month old!
___________________________

and guest Karen of Random Reflections


Join us every weekend for a new muse university post! 
If you would like to provide a post for this series, please contact kat [at] kateyeview.com

Thursday, February 10, 2011

what inspires you? - lindsey

mission: MUSE - "what inspires you?"
by guest muse lindsey garrett
I take photos every day...WILLINGLY!! I will admit it I may be a tad bit obsessed with the whole thing and I blame it on my 5D. Since the addition of my first full frame last May I have filled up two external hard drives soon to be three. As I go from point A to point B in my perpetual rush having a camera reminds me to STOP and take the time to expand and enjoy the moments. Inspiration surrounds me and I find that I really don't have to look very far to see it.

Being a mother of two who works from home I have a limited amount of free time to roam. I shoot primarily in bursts and on the fly. I may be grocery shopping, pulling out of the driveway or just sitting in my front yard (butterfly). Exploring my own backyard and rescuing critters gives me a chance to capture so many natural treasures.


I am drawn to color and detail.


Surrounded by constant noise and activity I use my photography to create a world where there is simplicity and order.

Food and cooking is another source of great inspiration.

I spend hours in the kitchen with my ingredients and my camera. Be prepared if you come to my house I'll make you wait before you can have that first bite.

Cedar Plank Salmon

LIFE is sweet

Zov's Cupcakes

Nothing makes me more happy than when I successfully plate, photograph and devour my culinary creations.

My famous Tiramisu.

heaven on a plate

And on the days when I feel more relaxed and in the moment I find shoot more candidly.

23/365

Morning light makes me so happy.

ms. green eyes

when the rain never stopped

Light directs my attention to the little details reminding me that I need not look ahead so much but look around.

kitchen table

Life may be short but it is also very WIDE.

Thank you for having me muse with you. 
xo Linz


Lindsey Garrett lives in Southern California with her husband, two kids and her bipolar cat. When she is not busy stalking her favorite rockstars on twitter Lindsey chronicles her life on her blog the modchik. Over the past year her blog has become a platform from which she launched her photography business specializing in event and food photography. Her work can also be found in her ETSY store and OC Family where she writes a weekly photo blog featuring photo tips and prompts.


_____________________________

"what inspires you?" is the the second mission of mission: MUSE series.
You may submit an entry to mortalmuses {at} yahoo.com.

Monday, February 7, 2011

what inspires you?: austin-lee

mission: MUSE - "what inspires you?"
by guest muse austin-lee
 

Inspiration is such a multi-faceted thing. Sometimes it comes to you gently like a breeze, a little whiff of something leading you down a road that gets your heart beating faster, excited with possibilities. Other times it almost knocks you down, like a river that you just need to go with.. There are few things in my life that inspire me more than my babies. From the moments they were born, they've knocked me down with the love I feel for them, and inspired me to hold their sweet faces captured in pictures forever.


Sometimes inspiration comes from unexpected little places for me. You catch a glimpse of something out of the corner of your eye...like a leaf or a flower, the way the light is falling across someone's face, a vibrant color that you don't want to forget. Often times I'm inspired to document the sweet memories we are making each day with little dog ears called photographs. Ordinary moments that might slip by unnoticed if you didn't catch them just in time.


Inspiration is a blessing. People need and crave it. I think it's also something that can and should be shared. It gives us hope and moves us forward. Keeps us from being sedentary in our souls and helps us grow. So often I'm thankful for, and inspired by, the hard work, the sights seen, the words penned by people around me. By sharing what they feel and see with others, others are inspired to see and feel. It's a wonderful gift that we can set the soul of someone else on a creative journey...my hope for what inspires me is that it will, in turn, inspire someone else.

Austin Lee Barron of Bunch of Barrons
flickr: http://www.flickr.com/photos/envoutant/

_____________________________________

"what inspires you?" is the the second mission of mission: MUSE series.
You may submit an entry to mortalmuses {at} yahoo.com.
Submissions for "where i live" are still being accepted.

Saturday, February 5, 2011

muse university - creating the "fairy garden" effect

creating the "fairy garden" effect
a repost by
ashley sisk of ramblings and photos

Last year, I stumbled upon a tutorial on I Heart Faces called: "In the Fairy Garden." At the time, I was so excited to use it that I wrote my own variation of the tutorial for Photoshop Elements - HERE. I used those same steps to create the photo I submitted to Pioneer Woman. I previously shared this tutorial with the Paper Heart Camera community, but thought it was worth revisiting here at Mortal Muse University.

I've put a lot of work into recreating each step using screen shots and trying to simplify it the best way I know how. But you may also want to look at the original tutorial to find an approach that works best for you. I also seriously need to thank Michelle Johnson at Love that Shot for writing the original tutorial and turning me on to this effect!

Program: Photoshop Elements (I use version 7)
Estimated time: 15 minutes

Materials (open and download files): A clean processed photo of your choosing, Garden Lights 1 and Garden Lights 2.

Actions: We'll be using Coffeeshop Photography's Sun-Kissed Action and a Layer Mask (if you don't already have one - it doesn't automatically come with PSE unless you have version 9). Download HERE before you get started. I've linked nearly everything you need - all free. Before you get started, you may want to download and install the actions. Here's a great tutorial from the Texas Chick on installing actions. 

With all that said, open your cleanly processed photo (I decided against walking you through basic processing for this tutorial) - here is mine. 
IMG_6895 RS
Step 1: 
  1. Select one of the darker hues in your photograph using the eye dropper. Make sure your background is black and the new darker hue will be your foreground. 
  2. Create a gradient map layer (in your adjustment layers). 
  3. Check reverse 
  4. Lower the opacity to 45%. 
  5. Optional: You can change the gradient map layer's blending mode to HARD LIGHT for a slightly different look. 
Fairy Garden Step 1
Step 2:
  1. Create Hue/Saturation layer (in your adjustment layers). 
  2. Select Colorize.
  3. Change numbers to: Hue (35), Saturation (30), Lightness (0). 
  4. Lower opacity to 30%. 
  5. Use Soft BLACK brush at 30% (or less if you prefer) opacity to paint effect OFF in the layer. 
  6. Optional: You can change the Hue/Saturation layer's blending mode to SOFT LIGHT for a slightly different look.
Fairy Garden Step 2
Step 3: 
  1. Open Garden Lights 1 and Garden Lights 2 - they will be placed in the bin at the bottom of Photoshop Elements. Drag and drop Garden Lights 1 texture (from bin) on top of your photo. You may need to rotate it by going to the corner of the image and pulling right or left. There are other ways to apply textures, but this has always been the easiest way for me. 
  2. Change the blending mode to SCREEN.
  3. Lower the opacity to 30%
  4. Use a soft BLACK brush at 30% (or less if you prefer) opacity to remove texture from the flower (or your subject). You will have to add a layer mask (in the previous steps, it was automatically given) - you can download a layer mask HERE
Fairy Garden Step 3
Step 4: 
  1. Drag and drop Garden Lights 2 texture (from bin) on top of your photo. You may need to rotate it by going to the corner of the image and pulling right or left. 
  2. Change the blending mode to OVERLAY.
  3. Do NOT adjust the Opacity - leave at 100%. 
  4. Merge layers (ctrl+shift+E)
Fairy Garden Step 4
Step 5:
  1. Apply Coffeeshop Photography's Sun-Kissed Action. If you have a chance, read through Rita's quick steps...she makes things so easy! You can see the adjustments I made below, but you should adjust them to your preference.
  2. The one note that I'll make here is that when you're prompted to render a lens flare I typically use my default settings: 50-300 mm zoom at 159%.  Unless it's over-powering, I won't adjust the opacity.
Fairy Garden Step 5
Step 6:
  1. Create a duplicate layer (ctrl+J)
  2. Go to Filter (in your top tool bar)>Other (at the very bottom of your drop down list) and select High Pass Filter. I think I have mine set up on 66 so I can lower the opacity later - feel free to experiment here. 
  3. On that layer, change the blending mode to SOFT LIGHT.
  4. Add a layer mask (You will have to add a layer mask - you can download a layer mask HERE.)
  5. Fill the layer mask with BLACK paint (in this case, you'll be revealing the effect, not removing the effect). 
  6. Use a Soft WHITE brush at 30% opacity and paint over the flower for an extra POP - this is my ALL TIME FAVORITE photo editing technique! 
  7. Now, create a levels adjustment layer. 
  8. Slide left slider to 10 (you can also add a vignette here, but I prefer this approach).
Fairy Garden Step 6 
Once you're done with that step, merge your layers and re-size and sharpen (if you're posting to the web). Here's the Before and After. What do you think? 
 Fairy Garden Before and After
What questions do you have? If you do try out this effect, we'd love to see your results!

Until next time, 
_______________________________

Join us every weekend for a new muse university post! 
If you would like to provide a post for this series, please contact kat [at] kateyeview.com

Friday, February 4, 2011

what inspires you? - chelsea

mission: MUSE - "what inspires you?"
by guest muse chelsea

"In the right light, at the right time, everything is extraordinary." 
~ Aaron Rose

To me, light creates magic.

 Dew drops in the grass sparkle like diamonds.
Beautiful silhouettes and dramatic shadows.
Flowers illuminated, glowing vivid colors and showing every detail.
Light is playful...hide & seek and peekaboo.
Something ordinary is transformed into extraordinary.
Light reveals, showing the intricacies and imperfections.
A rapid change in color as the sun rises and sets.

Light is what inspires me daily to pick up my camera. Seeking out natural light leads me, draws me in, and dictates when and what I will shoot.

Every morning is like unwrapping a present, unsure of what nature will kindly offer that day. Light is always there waiting for me, and these little moments of beauty take away my breath. I know that the sight before me will never be replicated exactly, so I treasure each photo as a way to remember it forever.

The synonyms of the word light are: bright, brilliant, clear, glowing, luminous, lustrous, radiant, resplendent, rich, shining, vivid. I am inspired by the physical presence of light. But these variations of the word perfectly illustrate what I strive to find in my shots, what I search out through my viewfinder, and what I hope my style reflects.

a musing by Chelsea Chamness of hearts and scars and chamcam on flickr

__________________________________________________________

"what inspires you?" is the the second assignment of the mission: MUSE series.
You may submit an entry to mortalmuses {at} yahoo.com.
We are still accepting "where i live" submissions.

Wednesday, February 2, 2011

what inspires you? - linda

mission: MUSE - "what inspires you?"
by guest muse linda jackman

When asked to answer the often asked query of "what inspires me?", my first thought... God and everything he has created, but that is too broad. Narrowing it a bit, I would say, the meaning behind the image.

I have always been a deep thinker and even as a child my brother would make up meaningless songs about my name and exasperated, I would plead with Johnny to tell me what it meant. He never would.

So for as long as I can remember my quest for meaning has been important. Everyone one is shaped by their experiences and those experiences are part of their heart’s story. I capture the images that tell their story and in the process capture a piece of their history. 

Here is an amazing story of an expectant mom: you can read it here.

And here is the story of a child being handed back the freedom of childhood. You can read about it here.
Hearts and daisies have a special meaning for me and I love to make them a concept.


Most of my portrait photography tells a story. Prior to the session I have to know what the story is and become immersed in it. I ask myself questions like, “What is it, how do they feel, what were they thinking. What do t hey like and dislike, what makes them cry and what makes them laugh? Most of the time my clients are in tears and have said "you have captured so and so's personality perfectly" . I know I have done my job when the tears are flowing.

So with meaning as my muse I tend to be a storyteller behind the lens with photos instead of words. Putting it down in black and white, I realize after all it is the human heart that inspires me above all else.


Thank you Muses for inviting me to dig deep down into my heart and see what inspires me.

Linda Jackman

Visit me at http://lindajackmanphotography.com/ for a sneak peek at my newest inspiration... templates, textures, and overlays..  Actions coming soon! 

You may also connect with me on facebook: Linda Jackman Photography

_____________________________

"what inspires you?" is the the second mission of mission: MUSE series.
You may submit an entry to mortalmuses {at} yahoo.com.