about More Musing

We are focusing on building a community, bringing the Mortal Muses photographers together, and making the world a bit smaller. On this page, you will find mission: MUSE, muse university and special features.

Monday, January 31, 2011

what inspires you? - genevieve

mission: MUSE - "what inspires you?"
by guest muse genevieve


I am inspired by the desire to create my own reality and bring you along with me. There is so much ugliness in the world.  Sometimes it takes concerted effort to see the beauty, effort that many people don’t have the time, ability, or circumstances to cultivate. I want to do the work for you. I want to use my camera to blur out the mud, crop away the garbage and skew reality just enough to remind  each of us that there is still good, pretty, sweet, kind, happy things worth looking at.


I want to make you look good. I want my photo of you, with a smile on your face and a spark in your eyes to be the best version of who you are, and I am inspired when I suceed in capturing that and turn it into a tangible thing.


I love the ability to paint with light, splashing sunshine on your best features for everyone to see and sending a shadow in to protect a flaw from the eyes of those same viewers. I want my photos of you to boost your confidence, make you feel good…make you realise you are beautiful because if I succeed then maybe, in some small way, that validates my reason for being.  Maybe reminding you of that was my contribution…and it inspires me to try again…

Genevieve Letkeman

facebook: Genevieve M. Letkeman
flickr: geneletk

_____________________________

"what inspires you?" is the the second mission of mission: MUSE series.
You may submit an entry to mortalmuses {at} yahoo.com.

Saturday, January 29, 2011

muse university: everyday textures

creating your own textures
a repost by
tammy lee bradley of bliss and folly

textured with burlap

In our last muse university post, Ashley discussed how to apply textures to your photographs using Photoshop Elements.  This week, I am creating textures from everyday objects and a scanner.  

To start this project, I wandered around the house and garage looking for items that would create interesting textures.  With a stack of diverse items at my disposal, I scanned each one.  Using Photoshop Elements 8, I made minor adjustments to color, sharpness, and brightness. The completed scans were used to texturized the photos shown below. I used Photoshop Elements 8 with a blending mode of Soft Light and minor adjustments to the Opacity. 

my husband's denim jeans


a sheet of my harp music - I erased the portion over the fiddle.


piece of burlap fabric - I erased some of the texture on the cup


marble slab


a generic paper towel


crumpled tissue paper


leather pillow


velour pillow


a few tips:

1. Be careful with coarse objects so you do not scratch your scanning surface. 
2. Cover your scanner with a dark sheet if you are scanning big items to avoid light leaks.
3. Keep it subtle.  I tried using crumpled tinfoil and brushed stainless but the final results were overworked.

I have provided more examples and a linky tool at bliss and folly.  Share with me your photos with homemade textures.  Get creative. Think outside the box and make sure to tell me what you used for your texture...  that's the fun part.
♥  tammy lee
_______________________________

Join us every weekend for a new muse university post! 
If you would like to provide a post for this series, please contact kat [at] kateyeview.com

Friday, January 28, 2011

where I live - canterbury, united kingdom

mission: MUSE - "where i live"
by guest muse gilly

Canterbury is a very beautiful, very old, and very small city in the UK. I’ve lived here for about twenty years – I came here to study for an MA at the University of Kent and liked it so much I never left. The city’s been in existence since pre-Roman times, and there are so many layers of history here that building work can take years because they have to allow the archaeologists time to excavate everything first. In Waterstone’s bookshop in St Margaret’s St, you can view the remains of a Roman bathhouse in the basement while buying your books.

This photo is taken from one of Canterbury’s parks, Westgate Gardens. It’s a long, thin park that runs alongside the River Stour, and the opposite end to the one you see here disappears into open countryside


The river runs right through Canterbury and although it’s really very shallow and not much more than a stream, there are punts operating along its navigable length. This makes for some idyllic scenes in summer.

Canterbury was once a walled city and you can still walk along much of the old city wall. Westgate Towers is the only remaining mediaeval gate to the city, and the road now runs through the archway underneath it. This is one place where the modern and the very old have an uneasy co-existence: double-decker buses have to inch slowly through the arch, occasionally getting stuck and entertaining passers-by. This photo shows the wider end of the archway – the far side is smaller and buses and large trucks only have inches to spare on each side.

Canterbury is best known for its Cathedral, which dominates the city and is a stunningly beautiful building. I’ve taken so many photos of the Cathedral and its surroundings that it’s almost impossible to choose just one, but this is my current favourite shot of it. You can see the Cathedral interior reflected in the sphere – this is part of the lectern right at the head of the Choir and it’s formed of a golden eagle which supports a bible on its back and holds this ball in its feet. It reminds me of some lines from Ted Hughes’ poem Hawk Roosting:

‘It took the whole of Creation
To produce my foot, my each feather:
Now I hold Creation in my foot’

I could fill a whole book with the huge variety of ancient and picturesque buildings we have here. The following picture shows how well the black and white timbered Tudor style buildings show up when we get a rare fall of snow. Although it’s often wet in winter and we do occasionally get light snow showers, it’s very unusual for snow to lie, so we don’t see this very often:


The snow also makes it easier to see the mediaeval ducking stool in the next image – you can spot it sticking out high over the river, just above the boat. The ducking stool was both a form of punishment and a way of testing to see if someone was a witch. It was used to punish nagging wives and cheating businessmen by dunking them in the river. However, more worryingly it was also used to determine whether or not someone was a witch. The accused woman would be strapped to the chair and lowered beneath the surface of the water for 2-3 minutes. If she survived then it was thought that she had used her powers to stay alive and she would then be burned at the stake. If the woman was dead when they brought her up again, then clearly she was not a witch and her name would be cleared and her family given an apology from the church. There are times when you just can’t win……


The main shopping streets are lined with loads of quirky and colourful cafes and tearooms. This is just one of them, but I particularly like it because of its brightly coloured chairs, tables and tablecloths.

This is just a tiny taste of where I live – there’s so much more I could have shown you – but I hope it gives you a flavour of the kind of place it is and how much history we have here. I fell in love with Canterbury when I first came here and I still love it after twenty years – it feels like home now.
gilly of www.gillywalker.com and GillyinKent on flickr

______________________

We would love to see where you live. If you would like to join in, send an email to mortalmuses [at] yahoo.com.

Wednesday, January 26, 2011

what inspires you? - cara

mission: MUSE - "what inspires you?"
by guest muse cara

MOMENTS

If I had to pick one word to describe what inspires me it would be moments. Those moments that go by so fast that you can’t get back…unless, you take a picture. I love to look back at a picture and remember what was going on, how I felt and why I took the photo.

Fix


I remember that it was snowing our second round of 20 inches and the power was out. We had heat from the fireplace and light from the kitchen doors. We played cars in the living room near the heat and never changed out of our pajamas. Seeing him intently playing with the sun behind him made me run for the camera.

nico_at_the_doctors

I will never forget the time I took Nicolo to the doctors and he refused to get off the floor. The doctor was kind enough to actually get down on the floor and examine him there.

The first time I captured the smile on my son’s face I was hooked. I then tried to take as many pictures of that beautiful face as I could. It took a while for me to realize that your subject doesn’t always have to be looking at the camera or be their face for that matter to be a portrait. Some of my favorite photos don’t show the subjects face at all.

(6-1-10-56

We were in Yosemite National park and here it was okay for them to pick up rock and throw them in the water. I remember how Nicolo could have stayed and threw rocks for hours if we would have let him.

connection_3

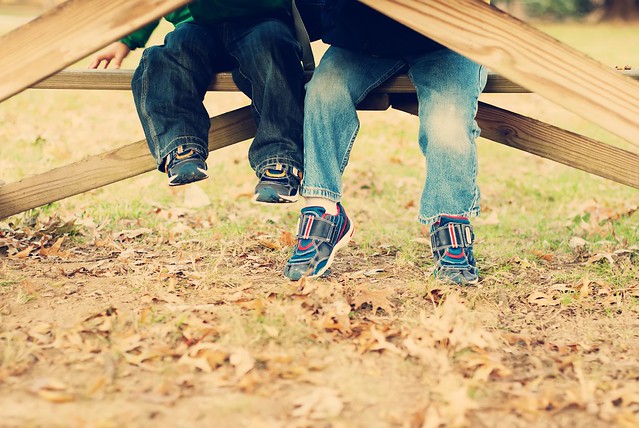
I remember picking the boys up from school and having a snack at the picnic table, I like how even though you can’t see their faces you know they are brothers.

I am also inspired by moments in nature; I fell compelled to capture them. The early morning dawn is one of my favorite times of the day and the hardest for me to get the chance to capture. When I do I am never disappointed and never forget the moment.

Mar 23 2010_6753

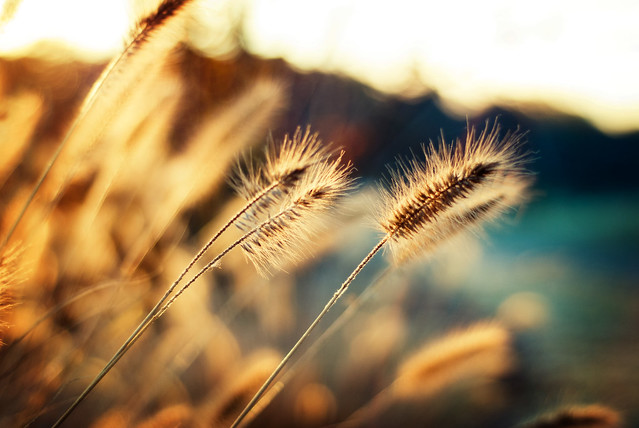
These webs only look like this at dawn when the dew has not yet burned off, I had to put on boots to walk in knee high grass to capture this, but totally worth it.

morninglight

The light in the picture lifts my spirit every time I look at it and I remember stopping on my way to work, with the kids, to capture it. Best reason in my book to be late.

So I will continue to capture the moments as I see them and cherish the memories they will bring.

~ Cara of I Miei Due Bambini

__________________________________________________________

"what inspires you?" is the the second mission of mission: MUSE series.
You may submit an entry to mortalmuses {at} yahoo.com.

Saturday, January 22, 2011

muse university - applying textures

muse university - applying textures

I LOVE LOVE LOVE working with textures. Sometime last year, I ran across Shadowhouse Creations. I fell in love with his use of textures and followed one of his tutorials step-by-step. Since that time, I have been a fan and actively incorporate texture into my work.

If you find yourself drooling over textured images, but don't know how to get started...today is your lucky day. But before, we get started, here's just a few sites that offer FREE textures:

Now, let's get started. I am using Photoshop Elements 7, but you can use any version of Photoshop or Photoshop Elements for this tutorial. 

Start by opening your image. You'll want to run your typical clean processing before applying any layers (I would recommend the same if you're working with actions). Here is my original image before applying textures:
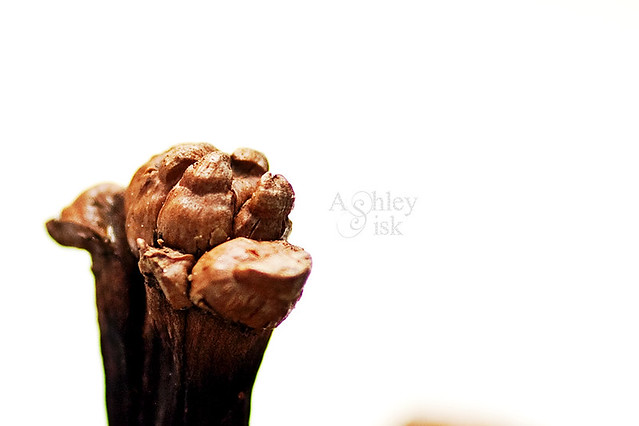
Pinecone Tip BEFORE
I would then create a duplicate of your image. If for some reason, you don't like what you've done, then you won't feel too bad about closing out the image. Then, on your duplicate image, create a duplicate layer by clicking CTRL+J (COMMAND+J for MAC users). This will come in handy if you choose to apply an optional effect (I'll talk about this later).
Step 1
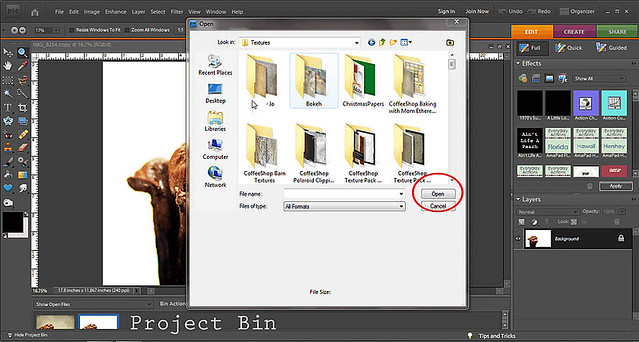
Now open your texture folder. I have one in my picture folder called TEXTURES. Select the texture(s) you want to use and click OPEN. They should be JPG files and will open like any other photo in your project bin.
Step 2
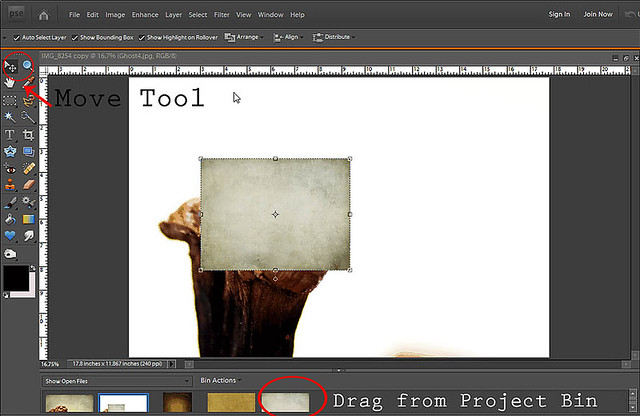
Go back to your duplicate image. Then select the first texture (called Ghost 4 by Shadowhouse Creations) you want to use with the move tool. Drop the texture on top of your image. Click CTRL+T (COMMAND+T) and pull the sides of the texture until it fits the frame.

You will now want to select a blending mode. My default blending mode is SOFT LIGHT. However, with this particular image, because of my white background, I decided to use MULTIPLY to darken the image with my texture.

If you want, you can use one texture with multiple blending modes to create an interesting look. In the image below. I duplicated my first texture and applied a soft light blending mode at a 22% opacity.
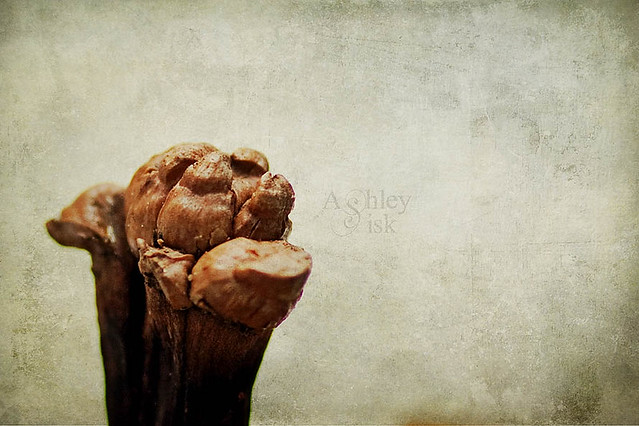
IMG_8254 one texture blending modes
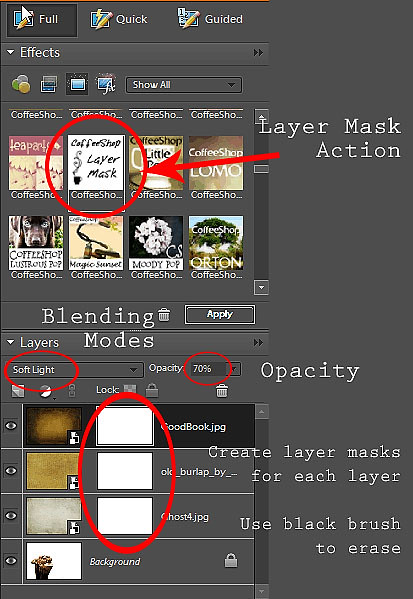
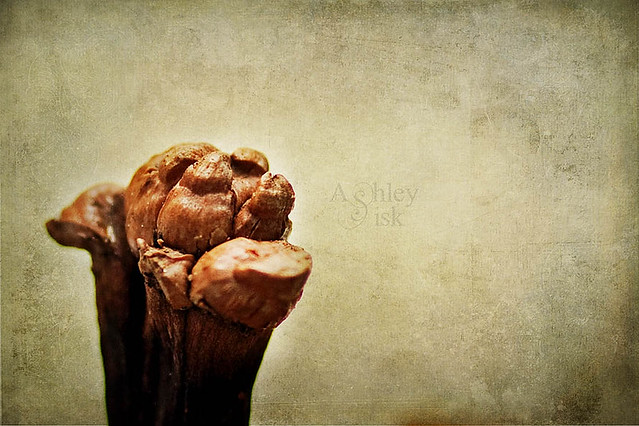
Another approach to working with textures is to use multiple textures. This is the approach I used for this particular image. I dragged on a second texture (called Burlap - artist unknown...I downloaded it a long time ago) and applied a soft light blending mode at 15% opacity. I then applied a third texture (called Good Buck by Shadowhouse Creations) and applied a soft light blending mode at 70% opacity.
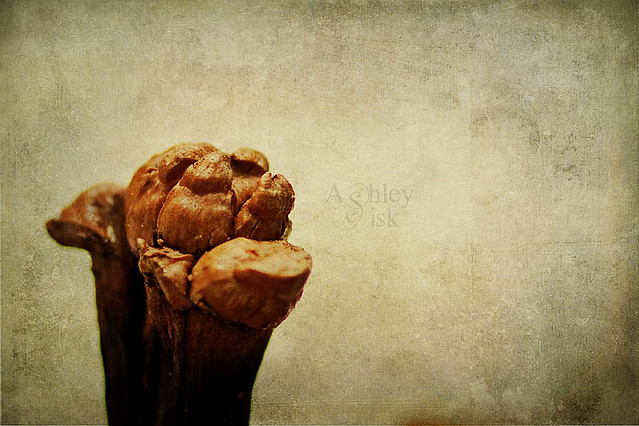
IMG_8254 multiple textures
I really like the way this looks but I prefer to use LAYER MASKS to erase the texture from the main subject of my image.

In Photoshop Elements 9 and full versions of Photoshop, layer masks are built into the program and can usually be found at the bottom of your layer space (it's usually a small square box with a circle in the middle of it). In earlier versions of Photoshop Elements (like the version I use), you must download a LAYER MASK ACTION (CoffeeShop Blog offers one HERE - if you need download/installation instructions, click HERE).

So, once you've got a layer mask action, go to each of your texture layers and click the action to apply a layer mask. 
Step 3
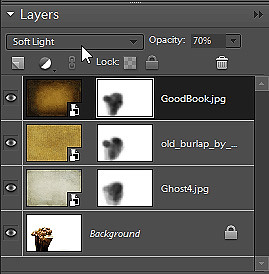
Use a soft BLACK brush at 25% opacity to brush away the texture on each layer from the image. If you erase too much of the texture, you can always switch to a WHITE brush to reapply the texture. You'll get something similar to what you see below (although this looks a little messy as I was reproducing my original edit).
IMG_8254 layer masks
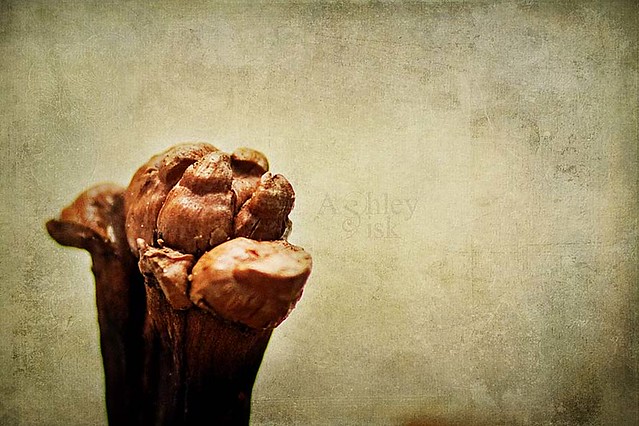
As you see below, I've used a soft black brush to erase part of the texture. At this point, you have options. You can finish your edit by merging your layers (CTRL+SHIFT+E), you can add more textures, actions, overlays, etc., OR you can use that background layer copy that I told you to create in the very beginning to add a little extra boost. Change that layer's blending mode to HARD LIGHT and drag the layer on top of the texture layers. Then lower the opacity until you are satisfied. For this particular image, I didn't think it looked good, but it's one of my favorite techniques for adding a little boost to my image. Try it!
Step 4
Just a reminder...the before (without texture) and after (with texture. Which do you like more?
IMG_8254 Before and After
Thanks for joining me this week at Muse University. If you want to learn more about applying textures, check out Kim Klassen's Learn Textures in Ten - New and FREE eCourse.

Tammy will be following up this tutorial with another tutorial on creating YOUR OWN TEXTURES from everyday objects. I don't know about you, but I am personally really excited to learn how to make my own textures. Stay tuned!
IMG_8254 RS
Until next time,
Ashley of Ramblings and Photos


___________________________

Join us every weekend for a new muse university post! 
If you would like to provide a post for this series, please contact kat [at] kateyeview.com


Friday, January 21, 2011

where i live: oklahoma, usa

mission: MUSE - "where i live"
by guest muse amy

I live in Oklahoma. Now if you’re already envisioning Native Americans, wheat fields and cattle, you wouldn’t be very far off. But I live in the “big city” and as easy as it may be to step into the country around here, I’m far from a country girl. My family migrated to Oklahoma when I was little and I’ve spent most of my life in this state. I remember being teased about it from my cousins living in California (where I was born) when I was little. They all thought Oklahomans were hicks. Maybe some of us are but we’re also the nicest hicks you’ll ever meet and perhaps that’s what keeps people living here.


It’s only in recent years that I’ve seen Oklahoma as far from ordinary. Its treasures aren’t as easy to find but they’re out there waiting to be discovered. Armed with my camera, it’s my desire to bring these hidden treasures to life. I bet there’s a lot about Oklahoma that you don’t know. Like the fact that:
We have a booming city life. If you go downtown in OKC you can watch a Thunder game, visit a few art museums, catch a concert or play at the Civic Center, and eat at a variety of great restaurants.


We have “mountains”. Ok, so they’re not like 14,000 feet tall or whatever. But they are technically considered mountains and so Oklahoman’s call them that.


We have wineries. It ain’t Napa Valley, but we do have a growing amount of vineyards popping up across the state and Agritourism has become a very popular attraction.


We have lots of great lakes for recreational activities. In fact, we have the most lakes created by dams in the entire United States…more than 200.


We have the best sunsets. You haven’t seen a sunset until you’ve seen one in Oklahoma. Since we have a lot of wide open spaces, even in the city you can witness beautiful sunsets on a regular basis.


There’s much more to Oklahoma than at first meets the eye. As much as I love to travel and see the world, I always have a great feeling when I’m heading back to Oklahoma. I guess that’s what coming home should feel like.

Thanks for visiting the panhandle state with me. Y’all come back now, ya hear? :)


You can check out my blog at www.amysroad.blogspot.com and my website at www.amynickersondesign.com.
______________________

We would love to see where you live.  If you would like to join in, send an email to mortalmuses [at] yahoo.com.