
muse university - applying textures
by ashley of Ramblings and Photos
I LOVE LOVE LOVE working with textures. Sometime last year, I ran across Shadowhouse Creations. I fell in love with his use of textures and followed one of his tutorials step-by-step. Since that time, I have been a fan and actively incorporate texture into my work.
If you find yourself drooling over textured images, but don't know how to get started...today is your lucky day. But before, we get started, here's just a few sites that offer FREE textures:
- Shadowhouse Creations
- Kim Klassen Cafe
- Betty Jo's Textures
- Textures by pareerica
- Isabelle Lafrance Photography
- Paint the Moon
- Nelly Nero
- Johnna LaFaith Photography
- DeviantART
- More Texture Websites
Now, let's get started. I am using Photoshop Elements 7, but you can use any version of Photoshop or Photoshop Elements for this tutorial.
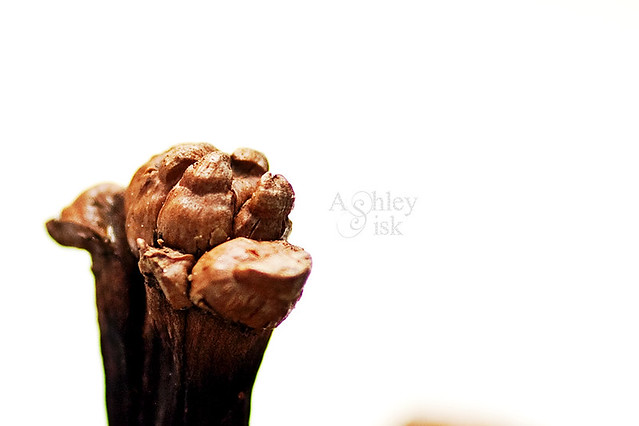
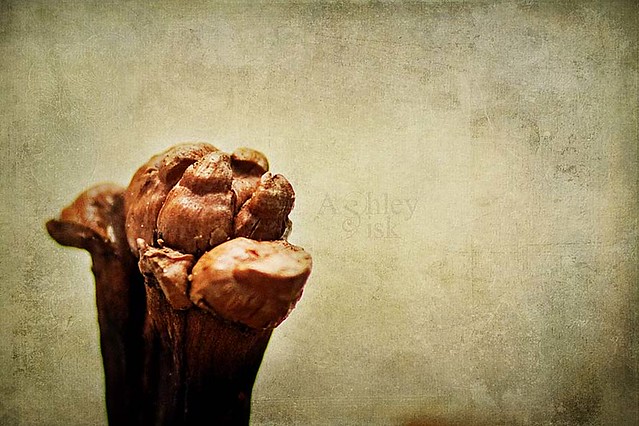
Start by opening your image. You'll want to run your typical clean processing before applying any layers (I would recommend the same if you're working with actions). Here is my original image before applying textures:
I would then create a duplicate of your image. If for some reason, you don't like what you've done, then you won't feel too bad about closing out the image. Then, on your duplicate image, create a duplicate layer by clicking CTRL+J (COMMAND+J for MAC users). This will come in handy if you choose to apply an optional effect (I'll talk about this later).
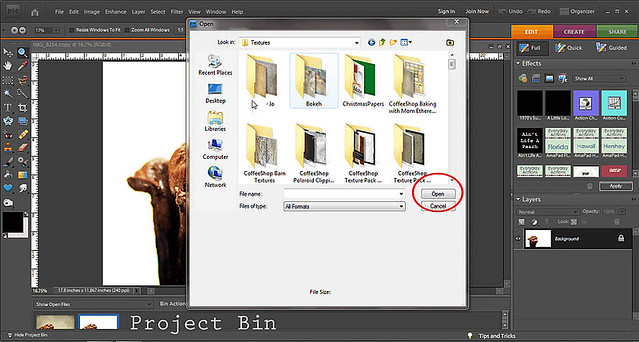
Now open your texture folder. I have one in my picture folder called TEXTURES. Select the texture(s) you want to use and click OPEN. They should be JPG files and will open like any other photo in your project bin.
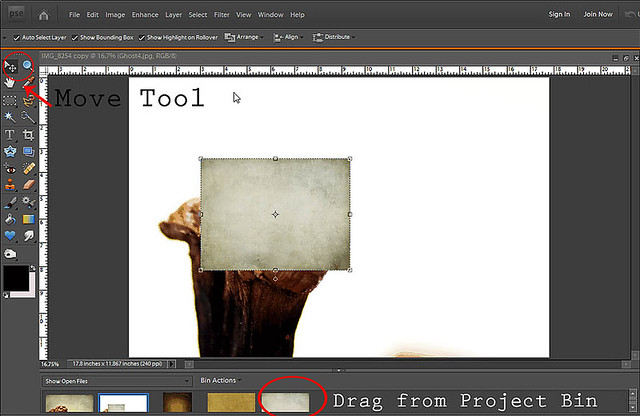
Go back to your duplicate image. Then select the first texture (called Ghost 4 by Shadowhouse Creations) you want to use with the move tool. Drop the texture on top of your image. Click CTRL+T (COMMAND+T) and pull the sides of the texture until it fits the frame.
You will now want to select a blending mode. My default blending mode is SOFT LIGHT. However, with this particular image, because of my white background, I decided to use MULTIPLY to darken the image with my texture.
If you want, you can use one texture with multiple blending modes to create an interesting look. In the image below. I duplicated my first texture and applied a soft light blending mode at a 22% opacity.
Another approach to working with textures is to use multiple textures. This is the approach I used for this particular image. I dragged on a second texture (called Burlap - artist unknown...I downloaded it a long time ago) and applied a soft light blending mode at 15% opacity. I then applied a third texture (called Good Buck by Shadowhouse Creations) and applied a soft light blending mode at 70% opacity.
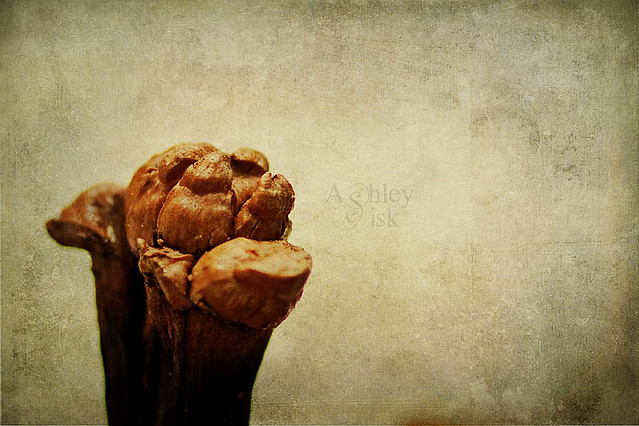
I really like the way this looks but I prefer to use LAYER MASKS to erase the texture from the main subject of my image.
In Photoshop Elements 9 and full versions of Photoshop, layer masks are built into the program and can usually be found at the bottom of your layer space (it's usually a small square box with a circle in the middle of it). In earlier versions of Photoshop Elements (like the version I use), you must download a LAYER MASK ACTION (CoffeeShop Blog offers one HERE - if you need download/installation instructions, click HERE).
So, once you've got a layer mask action, go to each of your texture layers and click the action to apply a layer mask.
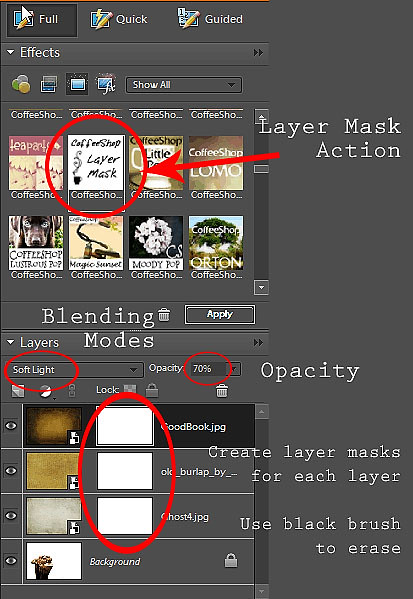
Use a soft BLACK brush at 25% opacity to brush away the texture on each layer from the image. If you erase too much of the texture, you can always switch to a WHITE brush to reapply the texture. You'll get something similar to what you see below (although this looks a little messy as I was reproducing my original edit).
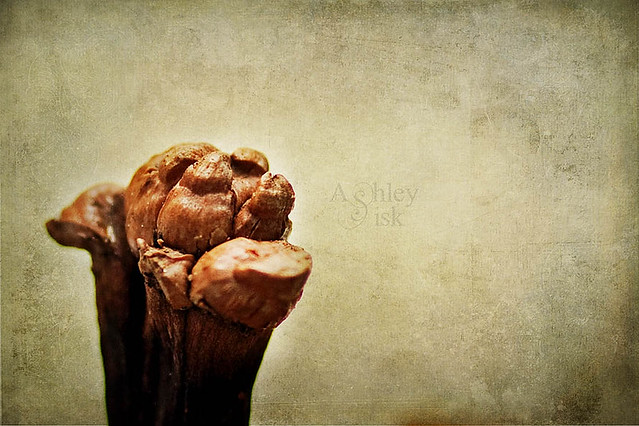
As you see below, I've used a soft black brush to erase part of the texture. At this point, you have options. You can finish your edit by merging your layers (CTRL+SHIFT+E), you can add more textures, actions, overlays, etc., OR you can use that background layer copy that I told you to create in the very beginning to add a little extra boost. Change that layer's blending mode to HARD LIGHT and drag the layer on top of the texture layers. Then lower the opacity until you are satisfied. For this particular image, I didn't think it looked good, but it's one of my favorite techniques for adding a little boost to my image. Try it!

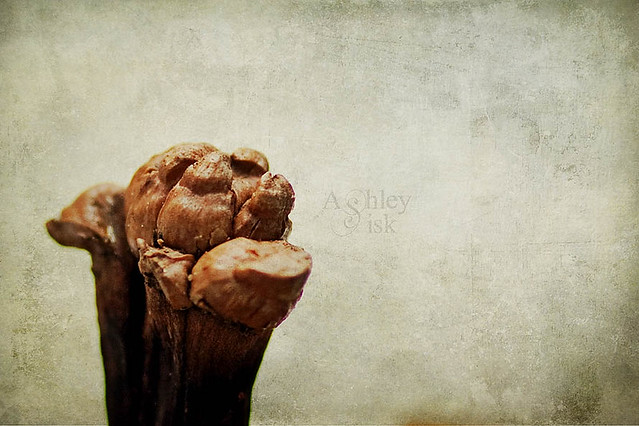
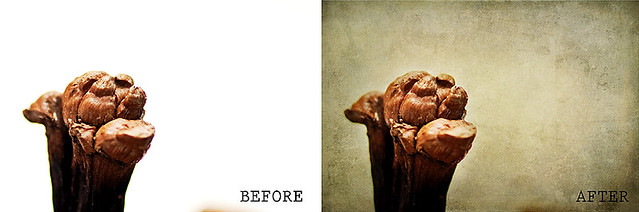
Just a reminder...the before (without texture) and after (with texture. Which do you like more?
Thanks for joining me this week at Muse University. If you want to learn more about applying textures, check out Kim Klassen's Learn Textures in Ten - New and FREE eCourse.
Tammy will be following up this tutorial with another tutorial on creating YOUR OWN TEXTURES from everyday objects. I don't know about you, but I am personally really excited to learn how to make my own textures. Stay tuned!
Tammy will be following up this tutorial with another tutorial on creating YOUR OWN TEXTURES from everyday objects. I don't know about you, but I am personally really excited to learn how to make my own textures. Stay tuned!
Until next time,
Ashley of Ramblings and Photos
Ashley of Ramblings and Photos
___________________________
Join us every weekend for a new muse university post!
If you would like to provide a post for this series, please contact kat [at] kateyeview.com
Wonderful tutorial Ashley! Thanks so much for putting this together.
ReplyDeleteAwesome tutorial Ashley! Love it! Gorgeous shot and edit :-)
ReplyDeleteHugs and love!
Jill
Great tutorial!! I love the edit. Can;t wait to learn about making my own textures.
ReplyDeleteGreat tutorial, Ashley, and thanks for the links to free textures.
ReplyDeleteThis was a great tutorial Ashley. I always take the harder way around than masking so appreciate the reminder.
ReplyDeleteI'm looking forward to the next class!
Great tutorial! I wish I was home and not on my phone so I could try it. Tomorrow it's a must!
ReplyDeleteLove it. Could you do a step by step fpr actions? I know there is a couple out there but I think maybe having a fresh tutorial may help.
ReplyDeleteWonderful!
ReplyDeleteThank you Ashley for this wonderful tutorial! Glad to have you with us. xo tam
ReplyDeleteGreat tutorial Ashley as always I learn so much from you!
ReplyDeleteI thought I knew how to use textures, but you taught me some new things - thanks!
ReplyDeleteGreat tutorial, Ashley! And, I love how it turned out.
ReplyDeleteFabulous, Ashley! Thanks, just in time for me to figure it all out before our textures theme. :)
ReplyDeleteThanks Ashley - you're the BEST!!!
ReplyDeleteAwesome tutorial Ashley! I love the After photo of course. It just gives that extra needed loveliness =) And makes it more interesting.
ReplyDeleteJust beautiful...I LOVE the after. Still quite advanced for me, but the more I see layers being done, the more the concept is starting to sink in. You TRULY are a great teacher :)
ReplyDeleteGorgeous, my friend! LOVE these textures! I have a little collection of textures, but none that are the color in your example. Off to search... Also, thanks for including the links to your favorite sites. I hadn't heard of a couple of those either. Great job - looks beautiful! ♥
ReplyDeleteJust came across your blog - it's wonderful!
ReplyDeleteThis is gorgeous! Can not wait to try it out!! :)
ReplyDeleteGreat tutorial Ashley! I always think you do a great job applying textures. They're subtle, yet make an impact! :)
ReplyDeleteAshley,
ReplyDeleteThanks for sharing your knowledge! I use Aperture for editing, so I may have to wait for a, soon to be released, plug-in to be able to do layers. My computer programmer brother has suggested Gimp, as a freebie alternative that can handle layers. Any other suggestions?